
Most things in life don’t come for free and unfortunately, this includes prepping. But it doesn’t have to cost you a small fortune either.
If you think smart and plan out your prep, you will definitely save money in the long run.
So before you grab your wallet, take a few minutes to read through this list of the 17 best critical preps you can do yourself for under a hundred bucks.
Note: Prices current at the time of writing but may have changed in the meantime. Use as a guide only as you may find similar, well-priced deals.
- 1. Find a Good Bug Out Location. Cost – Free
- 2. Plan Your Bug Out Route. Cost – Free
- 3. Try Out Some Survival Food for Free (but you still have to pay S+H). Cost – $4.95
- 4. Plan Your Bug Out Bag. Cost – Free
- 5. Plan Your Get Home Bag. Cost – Free
- 6. Keep In Touch. Cost – $19.99
- 7. Figure Out Your Finances. Cost – $14.99
- 8. Don’t Be Forced To Drink Contaminated Water. Cost – $19.95
- 9. Start a Coalition and Increase Your Chances. Cost – Free
- 10. Have Survival Paracord With You At All Times. Cost – Free
- 11. Be Prepared to Stay Warm. Cost – Free + $3.95
- 12. Find Access to Water. Cost – Free
- 13. Purify Your Water. Cost – $6.22
- 14. Take Stock of What Gear You Have. Cost – Free
- 15. Know How To Find Free Food. Cost – Free
- 16. Survival Seeds. Cost – $29.95
- 17. Light Your Path. Cost – $19.99
1. Find a Good Bug Out Location. Cost – Free
When prepping, it’s important to have at least one (but ideally, as many as possible) bug out locations scouted out. It’s not something you want to leave until last minute, so plan ahead.
There are a couple of ways you can do this.
The first and cheapest option is to study free online topographical maps, trying to find ideal bug out locations on public land. If these areas are close enough you should, of course, go there and scout the area in person after searching online.
The second way is to find a cheap piece of remote private land for sale. Purchasing the property obviously isn’t free but there’s no reason you can’t start searching for some properties today that you might consider useful in the future.
2. Plan Your Bug Out Route. Cost – Free
Now that you know where your bug out location is, the next step is figuring out how to get there.
And remember, you need to know the best way to get there.
For this, I like to use Google maps but you can use any online mapping program that you are comfortable with.
First, select your home address, then click the ‘Directions’ icon and enter the address or coordinates of your bug out location.
The first result that shows up will most likely be the driving route so make sure you also click the walking tab so you can see the best route on foot (after all, you might not be able to drive.)
I suggest zooming in and trying to plot a route that you think will be safest and offer the best cover. Look for parks and public land you can move through quietly without the risk of being seen.
Once you’ve figured out the best route online, go out and practice this route on foot. That way you’ll discover any obstacles or impassable areas before it’s too late. If you think it’s needed, go back and change your route until you have figured out the best route for you and your family.
3. Try Out Some Survival Food for Free (but you still have to pay S+H). Cost – $4.95
Whether you are just starting out and planning your food stockpile or looking to add to your existing pile, you should be adding some long life freeze-dried food.
The problem is, how can you tell if the stuff inside the pack is as nutritious as they claim? Or if it’s even edible?
Don’t worry. Now you can taste test them for free (minus shipping costs).
Head on over to the Valley Food Storage’s website and click on the Free Sample icon on the right-hand side.
Just pay the shipping and handling costs and a few days later a free sample meal will arrive on your doorstep.
Next step? Open the packet, read the instructions, cook it up and enjoy!
This stuff lasts for 25 years and tastes great.
4. Plan Your Bug Out Bag. Cost – Free
One of the most important things to consider when prepping. So make sure you plan your bug out bag correctly.
You don’t want to be slowed down or not have the essentials needed to survive.
Follow an online checklist and make sure you’ve got the right bag and the right gear.
5. Plan Your Get Home Bag. Cost – Free
A get home bag is essentially a survival bag that does what it says- it’s designed to get you home in a survival situation.
Because you won’t know where you’ll be the exact moment an emergency situation might arise, it’s important to have a bag filled with tools and gear to help you get back to your base quickly.
It’s important that each individual has their own bag as you might not be together when this time comes.
6. Keep In Touch. Cost – $19.99
Communication might not be talked about enough as a survival skill. If you want to give yourself the highest chances, it’s important to be able to both broadcast and receive communications. But that can cost a lot of money and energy to set up.
But you can get half of that expensive setup for as little as twenty bucks.
It’s as simple as buying a hand-cranked radio.
The best thing about these things is that you don’t need to depend on the power grid in order for it to work. Just give it a crank and it will recharge itself.
Perfect for any situation where you might benefit from critical information, whether emergency or tactical.
If the power grid is down, this might be the only way to receive information from outside sources. At just $19.99 on Amazon, it’s potentially a real life-saver.
7. Figure Out Your Finances. Cost – $14.99
Concerned about the global economic situation? If not, you should be.
When is the next big crash coming and how will it affect you and your family?
If you want the inside scoop, check out some books written by Jim Rickards. Rickards worked on several high profile projects for the CIA and helped develop financial analysis tools to recognize and stop terrorist money flows. He is one of the top financial minds out there and is definitely worth listening to.
His latest book, The Death of Money, will open your eyes to the current US financial situation.
At just $14.99 it’s an absolute steal and will help you to understand what is going on in this country today, as well as helping you figure out where we’re head and how to protect your family financially.
8. Don’t Be Forced To Drink Contaminated Water. Cost – $19.95
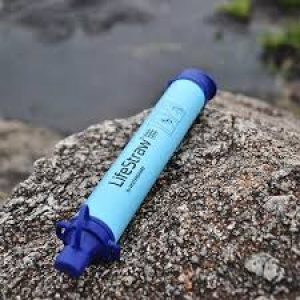
For me, this is one of the greatest innovations in survival gear in recent years. The Lifestraw Personal Water Filter.
If you don’t already have at least one of these in your survival kit, rush out and get one (or five) today.
Clean water is essential to your survival and this is one of the cheapest and definitely one of the easiest ways to be prepared.
At $11.99 each, these straws will ensure you and your family are able to drink clean, uncontaminated water if faced with a survival situation.
9. Start a Coalition and Increase Your Chances. Cost – Free
If you want to increase your chances of survival, you don’t want to ‘go it alone’. Even a small survival coalition will greatly improve your chances in an emergency situation.
Look for people that you trust and who also add value to your team. You don’t want to be carrying someone else’s dead weight with you.
And the best way to do that? You’re looking at it! The internet is full of groups with a similar mindset to you.
Or if you can’t find the right people that suit your situation, you can establish your own group.
Let’s look at the first option – finding a group to join. Start by doing some online research. Google, survival forums and social media are all great places to start. Ideally, look for newly formed groups that are looking for new members in your area.
This might be trickier than it sounds. Remember not everybody is concerned about what might happen in a survival situation. But if you find a like-minded group in your area, great!
But remember, they might not be too keen on adding new members to their established group, especially people they don’t know. So if you are having trouble finding a suitable local group, maybe it’s time to think about the second option – creating your own coalition.
This sounds scary to most people at first. Maybe you’re not a natural leader or haven’t had any experience forming a group before.
But don’t stress too much. Chances are, if you are trying to find a group to be a part of, then so are other people. And once you get a few members on board, there is no reason at all why you would need to be the leader if you don’t want to be.
Believe it or not, a good tool to help you get started forming a group is Craigslist. Here’s how to do it:
Go to Craigslist.com and select your location.
Click on ‘post to classifieds’.
Select ‘community’.
Select ‘groups’.
Then fill-in your basic details and post your advertisement looking to form a new survival coalition in your area.
Here’s an example for you.
“I’m interested in starting a survival coalition in (your area). Please get in touch if you are interested. You should include details about yourself, your current training/prepping skills and survival goals. A time and place will be decided upon for an initial meeting once I have received enough responses.”
The good thing about this ad is that: it’s local, it explains that you are looking for like-minded people to discuss survival strategies and it allows you to stay clear of anyone that seems potentially hazardous to the group.
All you have left to do now is wait for the responses to come in, review them and find the right people, then set up a meeting.
I wouldn’t advise meeting at your personal address. Meeting in public is always safer to begin with.
10. Have Survival Paracord With You At All Times. Cost – Free
If you’re lucky enough to have some high-quality survival paracord lying around the house then it’s not going to cost you a thing to turn it into something useful.
If not, I suggest you head out and buy some as it’s always handy to have around the house and you can make some really useful items out of it when you find some spare time during the day.
First, start with making something useful like a survival bracelet or monkey fist. Then research online to find a heap of other useful things you can make with survival paracord.
And why not start here with 17 great paracord project ideas you can make at home.
11. Be Prepared to Stay Warm. Cost – Free + $3.95
An absolutely essential item in any survival kit, a Mylar blanket will keep you warm in the coldest conditions.
Mylar blankets work by reflecting your body heat and then trapping that heat inside the blanket. So you are essentially being warmed by your own body heat.
Have at least one ready for each member of your family but I also recommend storing as many as possible in different locations. These things are a real life-saver in an emergency and will significantly increase your chances of survival if you are freezing.
At the low price of free + $3.95 P&H, why not stock up today?
12. Find Access to Water. Cost – Free
What are you going to do if the grid fails and there is no water coming out the taps? And those taps might not be coming back on anytime soon.
Do you have a rainwater collection system at your place to divert that otherwise lost rainwater?
If not, get one soon.
And it doesn’t have to be a fancy, expensive rain tank system. Try to find a barrel or large container of some description lying around your property or local area.
Next, you could buy a downpipe diverter (or make one up yourself using a drill and a small length of pipe), fit it to your downpipe, then place your barrel under the spout to catch the diverted rainwater.
13. Purify Your Water. Cost – $6.22
So, you’ve collected your water but that’s just the first step. Next, you’ll need to purify it.
Of course, the simple way, that most people know of, is to boil it. This works fine but you might not be in a situation where it is possible to start a fire. Perhaps the ground is too wet or maybe you don’t want to attract unwanted attention.
In this case, it is important you carry some water purification tablets.
They don’t cost much and are simple to use. So make sure you keep some of these ready for use around your house and in your bug out bag. You can pick up a pack of 50 tablets from Amazon for $6.22.
14. Take Stock of What Gear You Have. Cost – Free
One of the key points of a good survival prep is being organized. You should keep track of all the items you already own, and where it’s stored.
This helps you to make sure you don’t waste time and money stocking up on items you don’t need or already have.
Make a separate list of future purchases you need to make and try to keep it updated as often as possible as new ideas come into your head.
Also keep track of your perishable items such as food, water and seeds and make sure you rotate and replace them before they go bad. No point having a stock of food you can’t use.
A good way to keep on top of this is to label every item with the date of purchase and where the item should be stored.
You could go all out and purchase a proper labeler but all you really need is a pen, paper and some tape.
It’s especially important to keep a record where everything is located if you are stashing gear at many hidden locations.
15. Know How To Find Free Food. Cost – Free
Do you ever look around while hiking and wonder what foods are edible? As well as being an interesting topic to think about, it could also save your life. There are many different varieties and plants, vegetables and fruits that grow naturally across the US and are perfectly edible.
Most likely, there are more than you realize available to you in your local area, you just don’t know about them yet.
There is a multitude of books and information available to you on the subject, so do your research, then get out there and start looking for reliable food sources. Just be sure that you don’t eat anything you are not completely sure of, as this could have some nasty results.
Check out this guide to edible plants found in the USA.
Another good way to learn is to find out about walking tours in your local area, as many guides are knowledgeable on what can and can’t be eaten in the forests around you.
16. Survival Seeds. Cost – $29.95
It’s important to be able to grow your own food in a survival situation.
The crops you were depending on might have gone bad or you might not have access to them anymore. So having a bunch of these seeds in your kit is essential.
But don’t rush out and buy packets of regular seeds as they aren’t the same as survival (heirloom) seeds.
The key difference is that heirloom seeds grow produce that has seeds that can be used for the next crop. Regular seeds will only allow you to grow that one crop, so you may find yourself in a pickle after that season’s crop is finished.
17. Light Your Path. Cost – $19.99
It’s important to have access to light at all times. Tactical flashlights are available for as little as twenty dollars and of course range all the way up to hundreds of dollars.
Having access to light whenever it’s needed could save you and your family’s lives, so choose the best flashlight suited to your budget. Check out Amazon for a huge range of tactical flashlights.
Time to Get Prepping
Now that you’ve seen that it’s possible to start your prep for under $100, it’s time for you to get out there and start putting a plan into action. If it all seems a bit overwhelming, just tick off one item at a time and you’ll see that it is a lot easier than it first looked.
For those of you on a tight budget, I know it can take some time to save up the money for your prep, but remember, you don’t have to buy everything you need at once. That’s what prepping is all about. Setting up your prep plan to accommodate your budget and lifestyle.
You certainly don’t have to be rich to implement a good prep. Just think smart and plan ahead. Your family will thank you for it.