A Simple, Easy To Follow Step By Step Pemmican Recipe
Never heard of Pemmican before? Or maybe you have but you’ve never attempted to make it? Follow this guide and we’ll show you how.
Pemmican is an age-old Native American food developed centuries ago to aid their survival.
The Native American people developed countless survival techniques, many of which are still used today.
Perhaps the most famous (or most useful) of these skills was the development of a food source known as pemmican. The name comes from the Cree word for “fat” or “grease”.
Pemmican is an essential part of your food prep and is widely thought of as a survival super food.
This is because of it’s extremely long shelf life – pemmican can last for decades before spoiling – and it’s high nutritional value. Pemmican is calorie rich and is a great source of proteins and essential fats that the body needs.
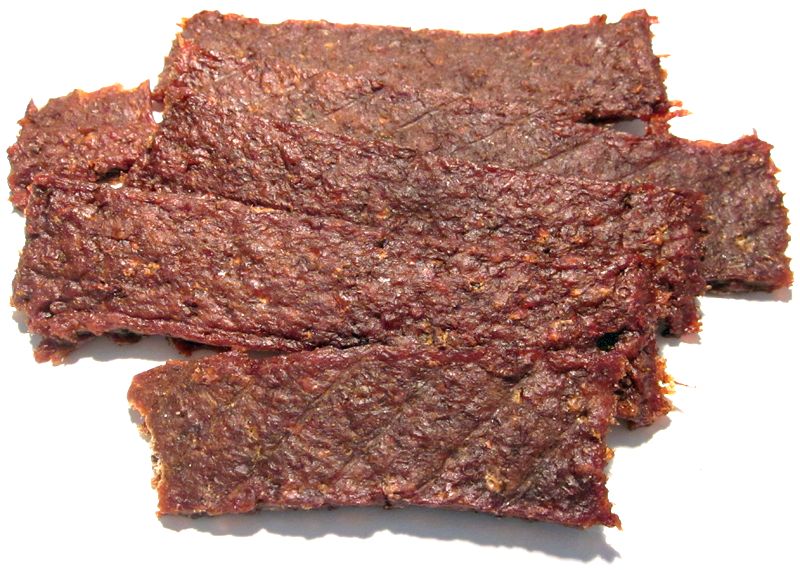
While traditionally made from game such as bison meat, pemmican is now made from almost all meat. Its rich flavor and ease of production make this a very popular food among preppers.
It’s a good idea to keep your food store stocked with plenty of pemmican, as well as keep a supply in your bug out bag and survival kit.
You could take the easier option and opt to buy your pemmican but it will benefit you far more to know how to make this super food from scratch.
After all, this is a survival skill that could feed you and your family and fend off starvation.
Knowledge is power, so learn from the Native Americans and it will help you survive an emergency situation.
The History of Pemmican
The main ingredient found in pemmican is meat. It was traditionally made by Native Americans using bison, moose, deer and elk meat and was a hugely popular snack due to ease of production, ease of transport and long shelf life.
After European colonization, the skills to make pemmican were quickly adopted by the settlers, who began to make it for their own food stores and its use by fur merchants helped to popularize it and give it its status as a great survival food.
So much, that it is still being used in more or less the same way today.
The recipes for pemmican have been around for hundreds of years, almost unchanged, so you can rely on them to make this hardy survival food at home.
How To Make Pemmican
With more pemmican recipes out there than you could shake a stick at, you may feel overwhelmed with choice.
But they are all more or less the same and have been tried and tested while being passed down through generations.
The core process remains the same no matter what meat or ingredients are used in an individual pemmican recipe.
So with that in mind, the following recipe is a stripped-down process to give you an idea of what a good base for pemmican should be.
Making Pemmican – Step by Step
Before we begin, here is an excellent video you can watch to see how the pemmican process works. Watch this video, then scroll down to follow the instructions below.
-
You’re going to need meat.
Fatty meat to be exact. Beef, elk, moose, caribou and venison are all high in natural fats and work great for pemmican.
I don’t recommend using rabbit, chicken or fish as these meats are too lean to provide the fat needed to make pemmican.
-
Dry the meat.
Remove all the fat but keep it for later. Then slice the meat into thin strips.
Then dry the strips in an oven (lowest temperature setting) or in direct sunlight. You’ll know the meat is dry enough if the strips are brittle enough to crack when bent.
-
Grind the meat.
Next, take your dried meat and grind it up in a food processor, or if you don’t have a food processor, cut the meat into small pieces with a knife then grind in a blender.
Of course, there wasn’t electricity hundreds of years ago when the Native Americans were developing this process (and there may not be in a survival situation either). So use a mortar and pestle if you’re lucky enough to have one and if not, grind the meat between two suitable rocks.
After grinding, the meat should look like a fine dust. You want it to be as ground as possible.
-
Process the fat.
Take the fat you saved in step 2 and put it in a pot over low heat. Wait for the fat to melt and begin to boil, then strain it through a mesh strainer.
-
Mix dry extras.
Now it’s time to mix-in your dry ingredients (we’ll talk about what dry ingredients you can use later in the article). You want to mix-in these ingredients with the meat dust in a bowl large enough to add the fat in after.
-
Add the fat.
Take your melted fat and mix it in with the dry ingredients and meat dust. Just pour it over and start churning.
-
Mix wet extras.
As with the dry extras, we will discuss this later in the article.
-
Form the mixture into bars.
The final step is to form your pemmican into bars. Do this while the mixture is still soft by pouring it into a shallow pan.
Allow time for the mixture to settle and take shape, then cut into smaller pieces once the pemmican has dried. Make sure you cut it into pieces that are easy for you to store.
If you didn’t already watch it, check out this video to get a good idea of how the process works.
Recipe Variations
Some people find that the taste of pemmican is good enough just the way it is, with just meat and fat. And in a survival situation, it’s all about providing you with energy and not spoiling on the shelf.
But if you want to (and I always do) you can add some extra flavors to your pemmican and make it taste that little bit better.
As I mentioned in the previous recipe, you can add two types of extra ingredients to your pemmican: dry and wet.
It’s important to note that you should never add anything fresh to the pemmican.
Fresh ingredients such as tomatoes or fresh garlic will drastically reduce the shelf life of the pemmican. So remember, any ingredients you add must have a long shelf life.
Dry Ingredients
Like the name says, dry ingredients are anything that has been dried. So that being the case, there is an endless list of dried ingredients that can be added.
Here are a few of my favorites to give you some ideas:
– Dried nuts: chestnuts, walnuts, almonds, peanuts etc.
– Dried fruits: bananas, apples, kiwis, pineapples, apricots, apples, mangoes, grapes, tomatoes, chilies etc.
– Spices: Chili, paprika, onion and garlic powder, dried oregano, basil and rosemary etc.
Wet Ingredients
Don’t get the term wet confused with fresh. Wet ingredients can be anything that doesn’t fall into the dry category that isn’t fresh.
Remember, adding fresh ingredients will significantly reduce the pemmican’s shelf life.
Some ideas for wet ingredients are:
- Caramel
- Syrups
- Honey
- Vanilla extract
- Molasses
- Peanut butter
With so many different ingredients available, it’s good to try out different flavors and get creative with your prepping. Try making different varieties of sweet, tangy or spicy pemmican bars.
It’s a good idea to do this before you start making a big batch to add to your store, as trying different flavors allows you to find the right flavor for your tastes and helps you work out how much of the wet and dry ingredients you should add. All while giving you plenty of practice learning this essential survival skill.
Storing Your Pemmican
Now you’ve made a massive batch of tasty pemmican, what comes next?
Storage of course!
Make sure this is done correctly or you could potentially face losing this vital supply when you need to rely on it most.
And remember, incorrect food storage could not only lead to spoiled food, it could leave you and your family very sick (or worse). Food poisoning is dangerous in any situation, but in a survival situation, it could prove fatal.
But if stored correctly, pemmican has the potential to last decades. So, what is the correct way to store pemmican?
One of the most crucial processes involved in storing your pemmican is making sure it is sealed in airtight containers. The best technique to achieve this is by using vacuum sealed bags, as this gives the highest quality storage by removing as much oxygen as possible. But if you don’t have access to a vacuum sealing system, Tupperware and zip lock plastic bags are still quite reliable. Just make sure to get a really good seal in place.
The reason you don’t want oxygen inside your storage bags is that oxygen can encourage mold growth. So by getting rid of the oxygen, you are getting rid of the potential of mold spoiling your food.
Make sure you store your pemmican in a location that is dark, cool and temperature controlled, as light and heat will have a negative impact on your stock.
Basements and pantries work fine but if possible, you should go all out and store your pemmican in an underground food storage facility.
Finally, make sure you keep your pemmican stored off the ground to ward off moisture and pests.
Why You Should Master The Art of Pemmican
In a survival situation, you need to be self-reliant. It won’t be possible to just make a run down to the local supermarket to pick up some steaks for dinner.
So it’s important to have a good food supply ready for any emergency but it’s better still to have the knowledge it takes to make your own long life survival super food.
Imagine that you hunt down a deer to provide for your family. You don’t want that precious meat to go to waste. So what better way to preserve and use it than to turn it into pemmican. And of course, no electricity or heat source is required. Just a few ingredients, some sunlight and a little know-how.
While its light weight and ease of transport make it an excellent survival food, pemmican doesn’t have to be for emergency use only. In fact, pemmican is a great snack and energy booster for all types of outdoor activities. So why not throw some pemmican in your pack the next time you are out:
- Hunting
- Backpacking
- Hiking
- Fishing
- Mountain biking
- Camping
- Kayaking
- Road-tripping
- Mountain climbing
The list could go on forever! And pemmican can give you the energy to keep on going forever too.
So what’s next? How about a pemmican business? How many people do you know in your local area that are selling pemmican at the moment? Why not monopolize this great snack and make some money to aid your prepping.
And keep in mind. Pemmican could be a great bartering tool to use in a survival situation. So you want to be the person that knows how to make it.
The Lost Ways – Pemmican Tutorial Guide
Let me let you in on a little secret – if you want to learn how to make great pemmican, head over to The Lost Ways website and watch their fantastic step by step pemmican video. Having a written guide is very important and useful but watching a video helps to ensure your pemmican making skills are top notch.
They have a great guide that is easy to follow and understand and even cover a few extra things that I didn’t include in this article.
It really is an invaluable skill to master, so you want to learn the best you can.
And even if you already know how to make pemmican, I would still recommend heading over to their site and checking out their video. I mean, you learn new things every day.
If you’re a first-time pemmican maker, I definitely recommend watching the video as it contains plenty of useful information about how much fat and meat you should be using and contains great ideas about what wet and dry ingredients you can add to make your pemmican extra tasty.
The video is very relatable – he uses his own kitchen, so you can see that you don’t need a huge, fancy meat shop or drying facility to make pemmican.
All you need is everyday kitchen tools and the will to make great survival food.
So if you are still uncertain about what to do or found any of the instructions in this article confusing, definitely click the link and watch this video.
And if you’re interested, they go into a little more detail about the history and culture of pemmican.
So, What Do You Think About Pemmican?
Personally, I love it! I can’t think of a better survival food. And the best part is that you can make it all at home.
So guys and gals, get into the kitchen and start practicing making this super survival food today.
And just some points to keep in mind:
- Store your pemmican correctly. If you do, it may last up to 50 years while remaining fresh and delicious.
- It’s a great source of protein and essential fats your body needs, as well as carbohydrates to fuel your body.
- It’s lightweight and easily transportable.
- It’s cheap to make and requires little ingredients.
- It’s super easy to make and can be done at home in your kitchen or in the wild in a survival situation.
So make sure you stock up today because any survival food store isn’t complete without a good supply of pemmican.
Remember, this simple food source will give you and your family the energy and nutrition needed to survive.
Treat pemmican making like an art, because with this skill, you’ll never need to go hungry.